Saturday, December 14, 2013

- Type Reflection, Late Binding, and Attribute Based Programming

Metadata:
.NET metadata is set of tables that mark all type definitions and referenced types.
TypeDef #n ( Type Definition ) represent a type defined within the current assembly.
TypeRef #n ( Type Reference ) is a pointer to the referenced type's full metadata definition in an external assembly.
TypeDefName contains the name of given type and Extends token contains the base type. String User token is represent all the string literal in your code.

Reflection:
Process of runtime type discovery. Reflection let you access all metadata information in your code (System.Reflection namespace). the System.Type class got some members that can be used to examine type metadata.( e.g. Type.GetMethods and Type.GetFields )
Type is an abstract class. System.Object defines a method named GetType(), which returns an instance of the Type class that represents the metadata for current object.
AnyType my_any_type = new AnyType();
Type my_type = my_any_type.GetType();
Or
C# typeof() operation, which doesn't need object instance:
Type my_type = typeof(AnyType);
Or
Using System.Type.GetType() static method and specify the fully qualified string name of the type. unlike the above approaches you do not need to have a compiled time knowledge of the type. This method got two overloads (two boolean parameters one for throw an exception if the type is not found and another one for case sensitivity)
Dynamic Load:
Loading external assemblies on demand. Assembly class in System.Reflection gives you load dynamically ability by help of methods such as Load() and LoadFrom(). LoadFrom() method is more flexible you can enter an absolute path. You are also able to supply <codeBase> value.
Late Binding:
Create an instance of a type and invoke its member at runtime without knowing its existence at compile time. Therefore manifest have no direct listing of the assembly. For .NET late binding process we use  System.Activator class. Activator.CreateInstance() method will help you to allocate an entity into memory on the fly which got several overload. Above method return System.Object and you are not able using explicit cast to cast to strong type since your program has not set a reference to corresponding assembly. here is an example:

// Try to load a local copy of any assembly.
Assembly asm = null;
try
{
    asm = Assembly.Load("AnyAssemblyName");
}
catch (FileNotFoundException ex)
{
    Console.WriteLine(ex.Message);
}
if (asm != null)
{
    // Get metadata for any type.
    Type any_type = asm.GetType("AnyAssemblyName.AnyTypeName");

    // Create an instance form any_type on the fly.
    object obj = Activator.CreateInstance(any_type);
    Console.WriteLine("Created a {0} using late binding!", obj);

    // Get info for any method.
    MethodInfo mi = any_type.GetMethod("AnyMethodName");

    // Invoke method ('null' for no parameters).
    mi.Invoke(obj, null);
}

In case your method got any parameter, you need to package up the arguments as loosely typed array of objects:
// Invoke any mehtod with arguments (first bool and second enum).
MethodInfo mi = any_type.GetMethod("AnyMethodName");
mi.Invoke(obj, new object[] { true, 5 });
.NET Attributes:
Code annotations that can be applied to type, member, assembly or module which embed additional metadata into an assembly. They are class type that extend the abstract System.Attribute base class. An Attribute applies to the very next item. To apply multiple attributes to a single item use comma-delimited list or alternatively put them as single attribute after each other:
[Serializable, Obsolete("This class is Obsoleted!")]
Named Property Syntax: when attribute got .NET writable property you may set the property by this syntax.
[AnyAttributeClass(AnyPropertyName = "property_value")]
Custom attributes can be applied to any aspect of your code (methods, classes, properties and so forth). You can restrict the attribute that can only applied to select code elements through [AttributeUsage] attribute which allows any combination of values from AttributeTargets enumeration. [AttributeUsage] attribute has AllowMultiple named property which specify whether attribute can be applied more than once on the same item ( default is false ), and Inherited named property shows whether the attribute should be inherited by derived classes ( default is true ). Mentioned named property and [AttributeUsage] should be on the definition of the custom attribute. like so
[AttributeUsage(AttributeTargets.Class | AttributeTargets.Struct, AllowMultiple = false, Inherited = false)]
public sealed class AnyAttributeClass : System.Attribute
You may also apply attributes on assembly level using [assembly:] tag. It is best practice that you place the assembly level attributes at top of the C# source code after using statements and before namespaces.
[assembly: CLSCompliant(true)]
Visual Studio projects got a AssemblyInfo.cs file, which is good place for assembly level attributes.

Expendable application should have following characteristics:
  • Must provide some input vehicle to allow the user to specify the module to plug in. (require dynamic loading)
  • Able to determine whether the module support the correct functionality in order to be plugged in to the environment (requires reflection)
  • Obtain a reference to required infrastructure and invoke the member to trigger the underlying functionality. (May requires late binding)
...
References:
Pro C# 5.0 and the .NET 4.5 Platform by Andrew Troelsen
Saturday, May 5, 2012

- Assemblies

Namespace:
Will help you to group your related types into custom namespace.
Default Namespace in project properties
You may split a single namespace across multiple C# files.
There are 2 ways to resolve name clashes when there are common types in namespaces:
  • Fully Qualified Names (NmaeSpace.Type).
  • Aliases: Resolve the ambiguity using a custom alias ( using AliasName = NameSpace.Type ). Also let you create an alias for lengthy namespace.
In order to have deeper level of type organization you may create nested namespaces. The IO namespace is nested within the System is an example.
using keyword, Fully Qualified Names and Aliases make no difference in terms of code size or execution speed.
.NET Assemblies:
Is a versioned, self-describing binary file hosted by the CLR. Code library (aka class library) is a *.dll that contains types intended to be used by external applications. Executable assembly can make use of types defined within an external executable file. .NET platform allows you to reuse types in a language-independent manner. Not only you can allocate types across language, but also to derive from them. Which provides language-neutral form of code reuse.
.NET assemblies are assigned a four-part numerical version number of following format:(default is 1.0.0.0)
<major>.<minor>.<build>.<revision>
public key value allows multiple versions of the same assembly to coexist in harmony a single machine. assemblies that provide public key information are termed strongly named.
self-describing: assemblies are record every external assembly they must have assess to in order to function correctly.
assemblies are deployed as "private" or "shared" (GAC global assembly cashe).
.NET assembly (*.dll or *.exe) consists of the following
  • A Windows file header : inform that assembly can be loaded an manipulated by the windows family of operating system
  • A CLR header: block of data that all .NET assemblies must support in order to be hosted by the CLR (defines nemerous flags that enable the runtime to understand the layout of the managed file).
  • Type metadata
  • An assembly maifest
  • Optional embedded resources
You can see the windows file header of any *.dll or *.exe by entering following code  in Developer Command Prompt:
dumpbin /headers YOURFILENAME.exe
Headers data in .Net assembly's information is used under the covers when windows loads the binary image into memory. Unless you are building a new .Net language compiler these information is not necessary to know.

for seeing the CLR file header:
dumpbin /clrheader YOURFILENAME.exe
The CLR header is a blok of data that all .Net assemblies must support in order to be hosted by the CLR. This header defines numerous flags that enable the runtime to understand the layout of the managed file.

Major benefit of constructing multifile assemblies is that they provide a very efficient way to download content.
.Net Platform supports satellite assemblies that contains localized resources for the purposes of building international softwares.

You can see the below dialog by clicking on "Assembly Information..." button in "Application" tab of project properties( previous image):
Assembly Information
AssemblyInfo.cs (below screen shot) file will be updated after saving your changes
AssemblyInfo.cs
AssemblyInfo.cs is contains number of .Net attributes, a majority of these attributes will be used to update the .custom token values within an assembly manifest.
In Manifest each ".assembly extern" block is qualified by .publickeytoken (exist if assembly have been configured by strong name) and .ver (version) directives. Assembly level attributes specified by .custom tokens.
All Visual Studio Class Library projects configured as private assembly by default. By referencing a private assembly in a new application, IDE will place a copy of the library in the client application's output directory.
XCopy Deployment: The CLR loads the local copy of external assembly. .Net runtime does not consult the system registry when searching for reference assemblies since you may relocate the original external assembly files.
Probing Process: It is a technique that .Net runtime uses to resolve the location of private assemblies. In another words it is a process of mapping an external assembly request to the location of requested binary file which can be whether explicit or implicit. An implicit load request occurs when CLR consult manifest in order to resolve the location of an assembly defined using .assembly extern token. An explicit load request occurs programmatically using Load() and LoadFrom() method of the System.Reflection.Assembly class type for late binding and dynamic invocation of type members purposes:
// An explicit load request based on a friendly name.
Assembly asm = Assembly.Load("LibraryFriendlyName")
FileNotFoundException exception will thrown by runtime if LibraryFrindlyName.dll or LibraryFrindlyName.exe is not located in application directory. CLR will load the very first assembly it finds during the probing process and the remaining will be ignored if there is any.

Configuring Private Assemblies:
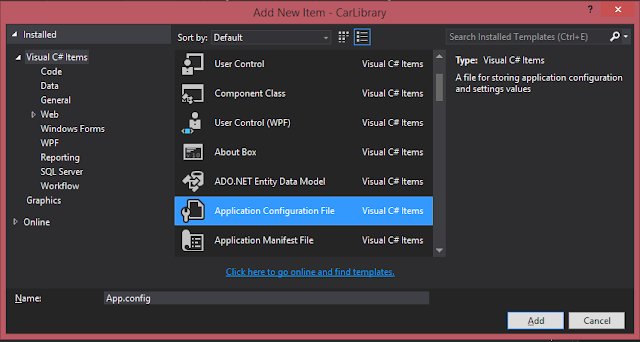
Configuration files name is following this format: LunchingApplicationName.exe.config which consist of various XML elements to influence probing process and deployed in the client's application directory. to create config file you may use text editor or Add New Item option in Project menu option below picture:
Application Configuration File
Shared Assembly: Unlike private assembly a single copy of shared assembly can be used by several application on the same machine. They installed into the Global Assembly Cashe (GAC). Only *.dll assembly files can be deployed as a shared assembly. GAC for .NET 4.0 and higher are located in C:\Windows\Microsoft.NET\assembly\GAC_MSIL. The subdirectory format is :  v4.0_major.minor.build.revision_publicKeyTokenValue

Generate Strong names:
In order to deploy an assembly to GAC a strong name needed to be assigned to uniquely identify the publisher of a given .NET binary. Strong name are based on two cryptographically related keys (public keys and private keys).
A strongly name is compose of a set of related data which is specified using the following assembly level attributes:
  • Friendly name of the assembly (name of assembly minus thse file extension).
  • Version number of assembly ([AssemblyVersion])
  • Public key value ([AssemblyKeyFile])
  • Optional culture identity value for localization purposes (AssemblyCulture])
  • Embedded digital signature (hash of the assembly's contents + private key value) 
Strong name also provide a level of protection against potential evildoers tempering with your assembly's contents. It is .NET best practice to strongly name every assembly.
Go to Signing tab of project properties as displayed in below picture:
Generate Strong Names

and fill up required data to generate the *.snk file :
New Strongly Type
Installing Strongly Named Assemblies to GAC:
  • Windows MSI Installer
  • Commercial installer program (e.g. InstallSheild)
  • gacutil.exe (.NET 4.5 SDK command line tool)
Redirecting to Specific Versions of Shared Assembly Dynamically:
CLR can load a version of shared assembly other than the version listed in the manifest by building a *.config file that contains <dependentAssembly> element. Here is an example;
<assemblyBinding xmlns="urn:schemas-microsoft-com:asm.v1">
  <dependentAssembly>
    <assemblyIdentity name="FriendlyNameOfAssemblyInManifest"
                      publicKeyToken="11111111111111111"
                      culture="neutral"/>
    <bindingRedirect oldVersion= "1.0.0.0"
                      newVersion= "3.0.0.0"/>
  </dependentAssembly>
</assemblyBinding>

Publisher Policy:  allows the publisher to ship a binary version of *.config file that is installed into the GAC along with newest version of assembly. You do not need to copy *.config file in client directories  anymore.
If the CLR find the publisher policy assembly it will read the embedded XML  data and perform the requested redirection at the level of the GAC. You may create one by using al.exe ( Assembly Linker). Using this technique you can design a machine wide redirection for all applications using specific version or ( range of versions) of an existing assembly. You can disable publisher policy on a client-by-client basis; by making a custom *.config file and set the apply attribute of <publisherPolicy> element to no .

<codeBase> element in *.config file instruct the CLR to explore for dependent assemblies located at arbitrary locations. When the assembly located on remote machine, the assembly will download on demand to GAC in a specific directory called download cache. to see you can use the following command in Developer command prompt: gacutil /ldl.

You can access *.config file <appSettings> element which contains <add> elements which contains key/value pairs through code by help of System.Configuration namespace.
// Get data from the *.config file.
AppSettingsReader app_setting_reader = new AppSettingsReader();
int count   = (int)app_setting_reader.GetValue("Count", typeof(int));
string name = (string)app_setting_reader.GetValue("Name", typeof(string));

More details about configuration file schema in .NET framework: Configuration File Schema for the .NET Framework


References:
Pro C# 2010 and the .NET 4 Platform by Andrew Troelsen &
Pro C# 5.0 and the .NET 4.5 Platform by Andrew Troelsen